SAM-SPL 64 - Sample Splitter

Product Info
SAM-SPL 64 is an audio plugin which lets you easily split a sample in up to 64 slices. It is compatible with any DAW supporting VST3 or Audio Unit format.Main Features
- 2 play modes: hold or trigger
- Play a single slice at a time or multiple (polyphonic)
- Each slice can be set to loop and/or play in reverse
- Edit the sample (Trim, Cut, Crop, Normalize (0dB, -3dB, -6dB), Resample)
- Continuous smooth zoom all the way to the sample level
- Show zero crossing
- Load a sample from the file system or directly sample an input (built-in sampler)
- Drag and drop a sample in the waveform view
- Export the sample as a file (wav / aiff supported)
- VST3 or Audio Unit compatible
Look & Feel
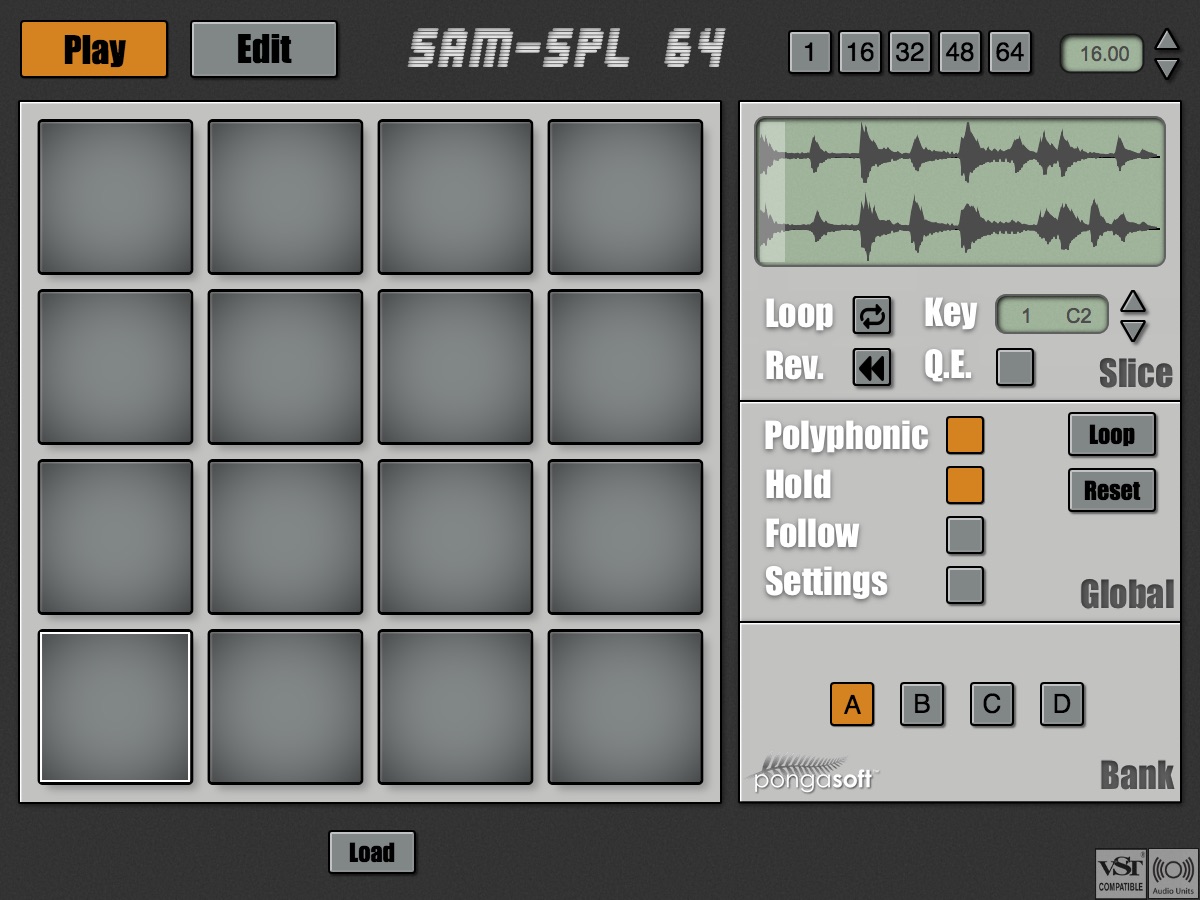
Play tab
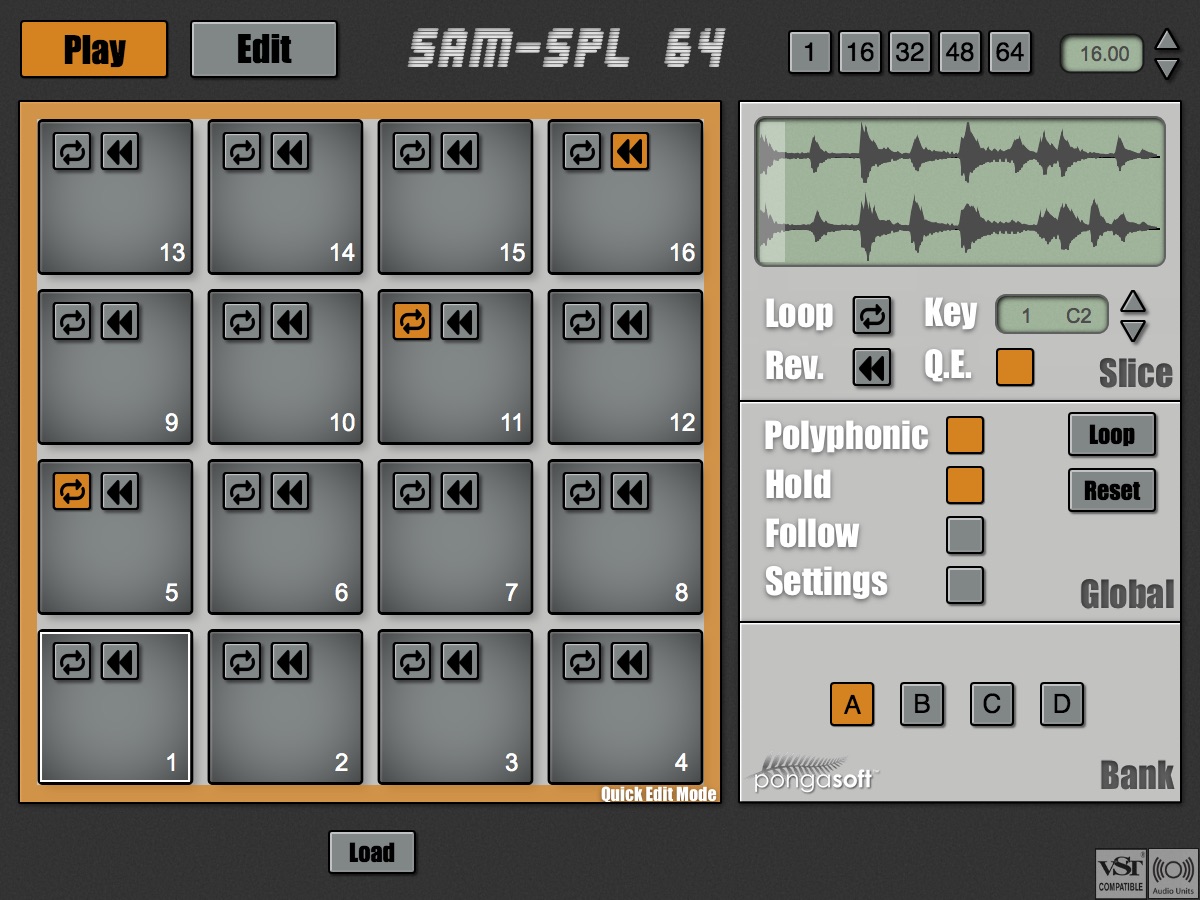
Play tab (with Quick Edit Mode)
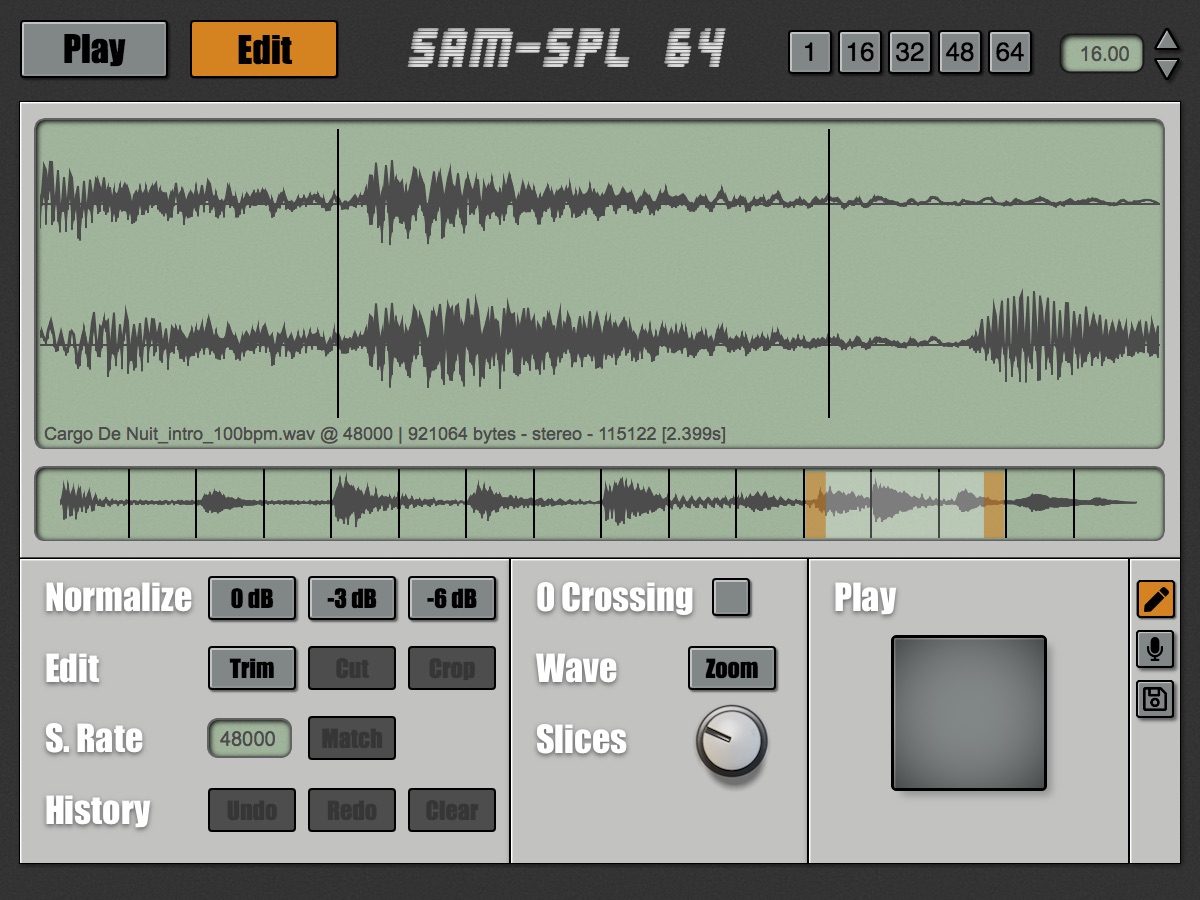
Edit tab
Sample subtab
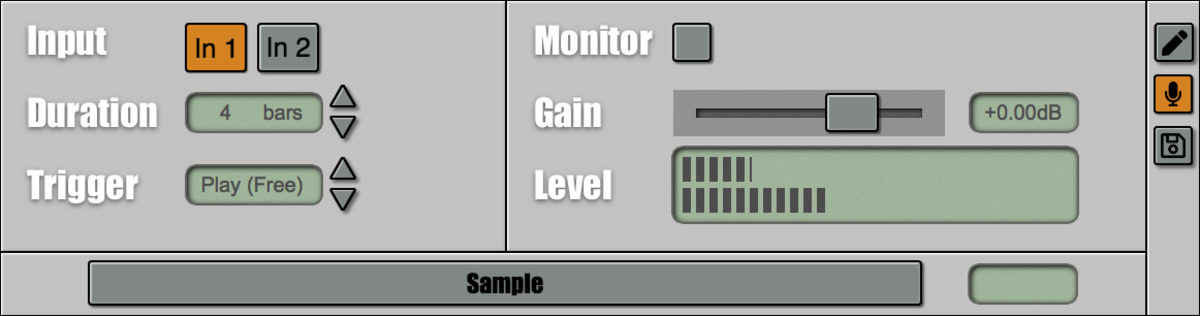
IO subtab
Installation
Download the plugin, unpack and follow the instructions in the included README.txt file. At this time, the plugin is available for macOS (Intel and Apple) and Windows 64 bits and works in any DAW supporting any of the VST3 or Audio Unit formats.Quick Starting guide
- Load a sample by clicking or drag/drop one into the waveform display.
- The sample is automatically split (irrelevant of tempo) into the number of slices selected (from to )
- Use the pads to trigger each slice (switch banks ( - ) to trigger slices beyond 16).
- Alternatively, use a Midi keyboard to trigger each slices (the Key display tells you which key triggers the selected slice).
- You can select whether a slice is being played in its entirety or only while a pad/key is being held by using the toggle.
- Select the tab to go into edit mode where you can:
- Analyze the sample (zooming and zero crossing)
- Apply various modifications to the sample (like cropping, normalizing, etc...)
- Import a sample either from the filesystem or by sampling an input (built-in sampler)
- Export the sample
Loading a sample
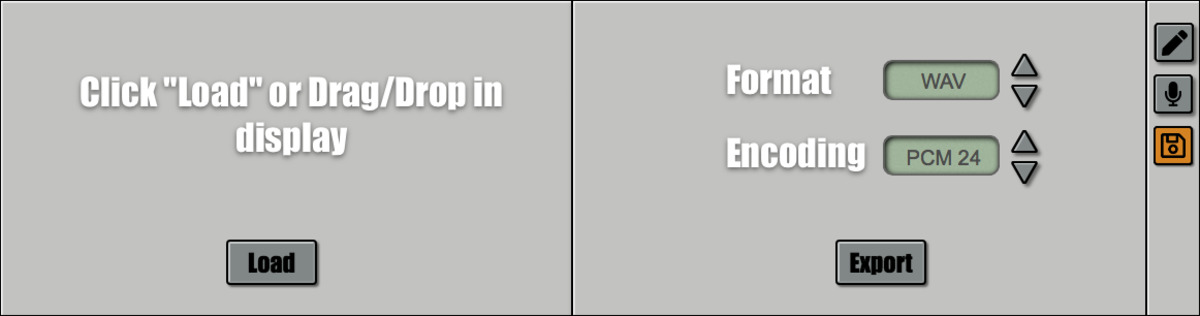
The plugin requires a sound/sample in order to play it. At this moment the plugin supports WAV, AIFF, MP3, Flag and Ogg Vorbis formats. There are multiple ways to load a sample:- Click the button below the pads on the tab.
- Click the button on the tab, subtab.
- Drag and drop a file directly from the computer into the waveform display on any tab.
Note that the plugin uses the temporary space on the computer to save the original sample and its edited version(s) while it is running. This space is automatically cleaned up when the plugin closes. A copy is obviously saved with the state of the plugin itself so that it can be restored if you close/reopen the DAW.
If you try to load a large file (> 20Mb), the plugin will display a warning message. Depending on your hardware configuration the plugin may be slower to handle such a file. If that is the case, you can try 2 things:
- Make sure that the file sample rate is the same sample rate as the DAW (resampling to match the DAW sample rate can be taxing). Note that the plugin can do that for you on the tab by clicking the icon.
- You can use an external audio editing software to reduce the size of the sample to the portion that you are interested in.
Slices
- After a sample is loaded (via "loading" or "sampling"), it is automatically split into a number of slices as specified by the number in the LCD window (top right of the device): smoothly from to slices. A non whole number of slices specifies that the last slice is smaller than the other ones.
- You can change the number of slices at any time by:
- Selecting a number directly (1/16/32/48/64)
- Using the up (resp. down) arrow next to the LCD window to increment (resp. decrement) the number of slices in whole numbers
- Clicking on the LCD window itself with the mouse and dragging up (resp. down) to increase (resp. decrease) the number of slices
- Shift clicking on the LCD window itself with the mouse and dragging up (resp. down) to increase (resp. decrease) the number of slices with smaller increments
- On the Edit tab, use the knob (you can also use the shift key to change more slowly)
- Each pad represents a slice.
- The section represents the currently selected slice and its settings:
- the waveform shows where the slice is located in the sample
- is a toggle which specifies what happens when the end of the slice is reached (start over or stop)
- (for Reverse) is a toggle which specifies how the slice is played (forward or backward)
- (for Quick Edit) is a toggle which shows/hide the "Quick Edit Mode" which lets you edit the slice settings direcly on the pads
- The Key display shows which slice is currently active as well as which Midi key will trigger it (in the above screenshot, slice 1 is selected and Midi key F2 will trigger it).
- The highlighted pad (the one with a white border) also shows which key is selected
- You can either press a pad, use the arrows next to the Key display, or click in the waveform to change the selected slice
- The bank buttons - let you switch which slices the visible pads represent in order to play them.
You can always trigger any slice you want via a Midi keyboard (or the sequencer) irrelevant of which bank is being displayed.
- The section represents settings that apply globally (to all slices):
- is a toggle which represents whether the playing behavior is monophonic or polyphonic. In monophonic mode, only one slice at a time can be playing, so if you trigger a slice and then trigger another one before the first one finishes playing, the first one will stop playing. In polyphonic mode, you can have as many slices playing as you want and they won't interrupt each other.
- is a toggle which represents whether you need to hold a pad (or midi note) in order to play the slice. If is selected, the slice will play as long as the pad (or midi note) is being held (note that if is not set, playing will stop once it reaches the end of the slice). If not selected, then the slice will play until it reaches the end even if the pad is released.
- is a toggle which, when set, automatically selects the slice via MIDI (for example a MIDI keyboard).
- opens up the Settings panel (see below) for adjusting less frequently used settings.
- is an action which sets all slices to loop at once. If all slices are already looping, then it cancels looping for all slices.
- is an action which resets the settings (loop and reverse) of all slices at once.
Settings
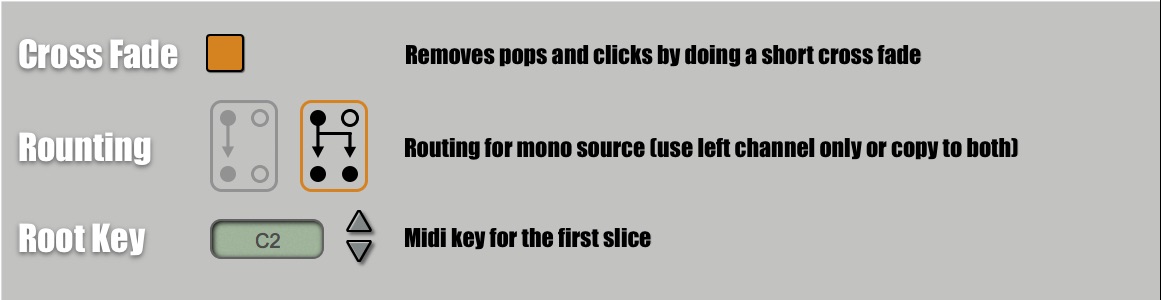
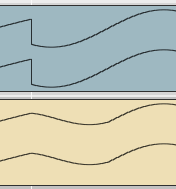
- is a toggle to enable or disable cross fading.
Because the sample you load gets arbitrarily split into a certain number of slices (up to 64), it will most likely generate unwanted clicks and pops due to the signal jumping (as seen in the blue image). When the setting is enabled (which is the default), it performs a short cross fade whenever the signal starts, stops or loops to prevent this unwanted clicks and pops (as seen in the yellow image).
- lets you choose how to handle mono files. By default a mono source will be output to both the left (channel 0) and right (channe 1) output channels. By selecting the other option, you can have the mono source be output only on the left channel (channel 0). Note that this setting has no impact on stereo sources.
- Root Key represents the Midi Key that will trigger the very first slice and can be changed with the arrows next to the display. Since all slices play sequentially, changing this value affects all slices.
If you increase this value too much, you may not be able to play all the slices anymore since the Midi keyboard is limited by the number of keys. If you use only 16 slices, it is safe to change this value to C3 for example.
Analyzing
The top section of the tab displays the sound as a waveform and allows you to analyze it by zooming all the way to the single sample level (1 pixel = 1 sample).Sample Data
The data displayed in the window gives you details about the content of the loaded (or sampled) file. In the screenshot above, the data shown is sampling.wav @ 48000 | 480812 bytes - stereo - 80128 [1.670s] which represents:| sampling.wav | name of the originally loaded file (when the sample originate from sampling, the name sampling.wav is used). |
|---|---|
| 48000 | sample rate |
| 480812 bytes | size in bytes that the file occupies (accounts for compression, headers, etc...) |
| stereo | whether the sample is mono or stereo |
| 80128 | total number of samples (per channel) |
| 1.670s | duration of the sample (in this example 80128 samples at 48000 samples per seconds is a sample of duration 1.67 seconds) |
Selecting
You can select an area of the waveform in order to edit it (or for zooming purposes). In order to select an area, simply click-drag in the window. Once an area is selected, you can extend the selection by shift-clicking the window. You can also double click the window in which case the entire slice where you clicked will be selected.
The end of the selection will automatically "snap" at slice boundaries (meaning if you are close "enough", then it will behave as if you had released exactly at the boundary). You can turn this off by pressing the
Alt key on your keyboard when you release.
| Click and drag | Select the area (and snap at slice boundary on release) |
|---|---|
Shift click and drag |
Extends the previously selected area |
Alt key |
Releasing while the Alt key is being held will bypass the automatic "snapping" feature |
| Double click | Select the slice where the double click takes place. |
| button | Zoom in/out of selection area |
z key (keyboard shortcut) |
Zoom in/out of selection area |
To select multiple slices, start by selecting one (double click) then extend the selection (shift-click) close to the last slice you want to select in which case it will snap at the boundary ensuring you are selecting whole slices.
Scrollbar
The waveform can be zoomed in and out using the scrollbar (located below the data) by click-dragging the . Once zoomed in, you can navigate the waveform by click-dragging the scrollbar itself. Pressing the button or thez key on your keyboard will toggle zoom in or out of whatever is selected.
| Click and drag | Control zoom level of the waveform |
|---|---|
Shift click and drag |
Control zoom level of the waveform in a slower/more precise fashion |
| Click and drag scrollbar | Scroll through the waveform (if zoomed in) |
Shift click and drag scrollbar |
Scroll through the waveform (if zoomed in) in a slower/more precise fashion |
| Double click scrollbar | Toggles between completely zoomed in (sample level) and completely zoomed out. The zoomed in waveform will be centered around the area that was double clicked. |
Zero Crossing
The toggle will render the areas where the wave goes from positive to negative (crosses zero) as red dots.
This option is only active if you are zoomed in enough: when zoomed out, a pixel represents multiple samples so the concept of zero crossing can no longer be accurately represented.
Playing
Clicking the pad will play the selected area of the waveform. If nothing is selected, it will play the entire sound.Editing
The tab lets you edit/manipulate the currently loaded sound (note that you can also load the sound directly from this interface). The various actions possible depends on whether areas are selected or not (buttons are disabled when an action is not available).| Normalize | Normalizes the entire sound to 0dB: computes the maximum value of all the samples in the sound and scale the sound so that the maximum value is exactly 0dB (1.0 as a sample value) |
|---|---|
| Normalize | Normalizes the entire sound to -3dB: computes the maximum value of all the samples in the sound and scale the sound so that the maximum value is exactly -3dB (10 ^ (-3/20) as a sample value) |
| Normalize | Normalizes the entire sound to -6dB: computes the maximum value of all the samples in the sound and scale the sound so that the maximum value is exactly -6dB (10 ^ (-6/20) as a sample value) |
| Edit | Removes silence from the beginning and end of the entire sound |
| Edit | Removes the selected area of the waveform from the sound |
| Edit | Keeps the selected area of the waveform from the sound and remove what is outside |
| S. Rate | Resamples the sound so that its sample rate matches the one from the DAW displayed in the window. Available only if it currently doesn't match |
| History | Reverts the previous action executed (which goes beyond the last edit, since loading a new sample or sampling are added to the undo history) |
| History | Replays the last action that was undone |
| History | Clears the entire undo history. This action is performed automatically if you destroy the plugin (by removing it or closing the DAW) as the undo history is not preserved with the state of the plugin. Can be used to free resources while the plugin is running |
The normalize (resp. ) action does not remove 3dB (resp. 6dB) from the sound. Instead it scales the sound so that the maximum volume is exactly -3dB (resp. -6dB).
Sampling
In the tab, clicking on the button will bring the sampling interface which lets you sample the input from the DAW directly. You choose which input to sample, for how long the sampling will take place, what is the trigger for sampling and then you can click to start sampling. The right hand side of the panel lets you monitor the selected input and adjust its gain. The Level window shows the volume of the currently selected input.Input
Not all DAWs handle inputs in the same fashion, this is why the plugin offers 2 of them so that it should cover most use cases.- For Reason (by Reason Studios), is
Audio In 1/2and isOptional Audio In 3/4 - For Maschine (by Native Instruments), is the side chain that you assign to the plugin.
- For Logic (by Apple), is the side chain that you assign to the plugin.
- etc...
Trigger
The Trigger section lets you define when the sampler kicks in after you press the button. You can adjust it by clicking on the arrows or clicking on the LCD window itself and dragging the mouse up or down.| Immediate | There is no delay, whether the host is playing or not, sampling will start immediately as soon as the button is clicked |
|---|---|
| Play (Free) | Sampling is delayed until the host starts playing and will start immediately when play is clicked at the host level. If the host is already playing then it behaves like Immediate |
| Play (Sync) | Sampling is delayed until the host starts playing and will continue to wait until a bar boundary. If the host is already playing then it will wait until a bar boundary |
| Sound | Sampling is delayed until there is sound (whether the host is playing or not) meaning there is a single sample that is not silent |
Because the sampling duration is defined as a multiple of bars, the Play (Sync) mode is particularly convenient to very quickly and easily sample the host in a fashion where each slice is perfectly aligned with the tempo and loop perfectly.
Exporting
In the tab, clicking on the button will bring the input/output interface which lets you load and save a sound. For exporting, you can choose the Format and Encoding by clicking on the arrows. A pop-up dialog will open when clicking to let you save/export the sound as a name and location of your choosing.Automation
Automation depends on the DAW/host. Since the plugin is defined as an instrument and every slice is mapped to a Midi key, in order to record the playback of slices you can simply record note input (either by manually drawing or via a Midi keyboard) as if you were using a synthesizer plugin.Sponsor
pongasoft produces a variety of high-quality and free/open source software. If you would like to support my work and help offset the cost of development tools, web hosting, etc., here is how to do so:
- Tip via Ko-fi
- Send money via PayPal
News
SAM-SPL 642026-02-08
- The project has been moved to Codeberg.
SAM-SPL 64 | v1.6.12024-12-09
Released SAM-SPL 64 v1.6.1 with the following changes:
- Fixed Audio Unit name collision
SAM-SPL 64 | v1.6.02024-11-29
Released SAM-SPL 64 v1.6.0 with the following changes:
- Fixed a crash when exporting the sample
- Make sure that the exported file is saved with the proper file extension
- Migrated to Jamba 7.1.2 / VST SDK 3.7.12
- Removed support for VST2
SAM-SPL 64 | v1.5.02023-04-28
A new version of SAM-SPL 64 has been released: v1.5.0:
- Added support for MP3, Flag, Ogg Vorbis (in addition to WAV and AIFF)
- Added error message when issue with loading file
- Fixed sound issues with Bitwig Studio
- Fixed drag and drop bug
Old News
1.4.3 - 2021-01-04
- Performance improvements and reduced memory usage
- Added support for Apple Chipset / universal build on macOS
1.4.2 - 2020-12-07
- Performance improvements and reduced memory usage
- Scrollbar overview now displays the stereo sample
1.4.1 - 2020-08-03
- Improved performance when loading a large file (especially on Windows 10)
- Display a warning dialog if loading a large file to allow to continue or cancel
1.4.0 - 2020-04-27
- Added slices display in the main waveform (Play tab)
- Improved performances (less disk access)
- Fixed several issues when file sample rate doesn't match DAW sample rate
- Some minor UI tweaks
1.3.0 - 2020-03-30
- The number of slices can now vary smoothly between 1 and 64 thus allowing higher precision
- A new LCD window displays the number of slices (and as a shortcut, you can click and drag on the window to change the value)
- Up and down arrows let you change the number of slices in whole numbers
- A knob on the edit tab lets you freely change the number of slices
- Shortcuts for 1/16/32/48/64 slices can be used
- Thanks to Denis Safiullin for suggesting the feature (based on the behavior of the Akai MPC 1000)
1.2.0 - 2020-03-18
- Added Settings tab
- Moved Root Key to Settings tab
- Added Cross Fade setting (on by default) to avoid pops and clicks
- Added Routing setting to handle mono file (mono -> mono or mono -> stereo)
1.1.0 - 2020-02-09
- Added "follow" option so that the selected slice follows MIDI input (ex: via MIDI keyboard)
- Added "Quick Edit Mode" to be able to quickly and conveniently see/configure the settings of each slice (loop/reverse)
- Added "Loop" action to loop on/off all slices at once (note that if not all slices are looped, then hitting "Loop" will make them all loop)
- Added "Reset" action to resets the settings (loop/reverse) of all slices at once
1.0.0 - 2019-05-19
- First release.