Introduction
glu is a deployment automation platform which allows you to easily and efficiently deploy applications on many hosts. In the glu model, there is an active agent (aka, the glu agent) running on each host. Since this agent is always up and running on the host, it can be used to monitor the host itself and/or the applications running on it. By using the timers feature of the agent and ZooKeeper, it is possible to build a very solid monitoring solution by reusing the infrastructure already in place for glu.
glu agent timers
The timers feature of the glu agent allows you to schedule a timer, defined by a piece of code (a closure), which is executed at regular intervals. The agent manages timers appropriately, taking care of running them for you and restarting them in the event that the agent restarts. The full api of the timers feature can be found on github. Here is how you schedule and cancel a timer in a glu script:
class MonitorScript
{
  def monitor = {
    // code that will run every 5s
 }

 def start = {
   timers.schedule(timer: monitor, repeatFrequency: "5s")
 }

 def stop = {
   timers.cancel(timer: monitor)
  }
}
The code defined in the monitor closure will be executed with the frequency defined at scheduling time until cancelled.
Adding monitoring code to the script
Now that we have timer, we can add the monitoring code. For the sake of this blog post, we will simply execute the uptime shell command.
class MonitorScript
{
  def monitor = {
    log.info shell.exec("uptime")
 }

 def start = { timers.schedule(timer: monitor, repeatFrequency: "5s") }
 def stop = { timers.cancel(timer: monitor) }
}
Here is the result of running this script: every 5 seconds, a message containing the output of the uptime command gets displayed in the agent log file.

Detecting and reporting errors from within the script
We can add logic to the script to change the state based on the result of the command (using the stateManager). The state will automatically be reported in ZooKeeper and propagated to the console.
class MonitorScript
{
  static String CMD =
    "uptime | grep -o '[0-9]\\+\\.[0-9]\\+*' | xargs"

  def monitor = {
    // capturing current state
    def currentError = stateManager.state.error
    def newError = null
    def uptime = shell.exec(CMD)
    def load = uptime.split()
    // check for load (provided optionally as an init parameter)
    if((load[0] as float) >= ((params.maxLoad ?: 4.0) as float))
        newError = "High load detected..."
    // change the state when currentError != newError
    if(currentError != newError)
      stateManager.forceChangeState(null, newError)
 }

 def start = { timers.schedule(timer: monitor, repeatFrequency: "5s") }
 def stop = { timers.cancel(timer: monitor) }
}
In the console, you simply add this entry for each agent (in the model):
{
  "agent": "agent-1",
  "initParameters": {"maxLoad": 1.0},
  "mountPoint": "/monitor",
  "script": "http://localhost:8080/glu/repository/scripts/MonitorScript.groovy",
  "tags": ["monitor"]
}
Note how I set the maxLoad parameter to 1.0 for being able to test more easily.
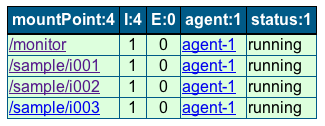
When the load is normal, the console dashboard looks like this:

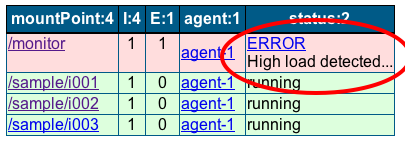
As soon as the load is too high, the console looks like this:

Making monitoring information available to ZooKeeper
We have seen how we can change the state so that it gets reported right away in the console. This is fine, and it also means that the detection logic lives in the script. If we want to be able to do more sophisticated monitoring (trending, etc…) the logic needs to live outside the glu script. We still want the script to collect the monitoring data and simply make it available so that an external process can consume it. This is actually trivial to do:
class MonitorScript
{
  static String CMD =
    "uptime | grep -o '[0-9]\\+\\.[0-9]\\+*' | xargs"

  // load is automatically available in ZooKeeper
  def load

  def monitor = {
    def currentError = stateManager.state.error
    def newError = null
    def uptime = shell.exec(CMD)

    // load is simply assigned to the field rather than a
    // local variable
    load = uptime.split()

    if((load[0] as float) >= ((params.maxLoad ?: 4.0) as float))
        newError = "High load detected..."
    if(currentError != newError)
      stateManager.forceChangeState(null, newError)
 }

 def start = { timers.schedule(timer: monitor, repeatFrequency: "5s") }
 def stop = { timers.cancel(timer: monitor) }
}
The code is almost identical: the only difference is that we simply use a field rather than a local variable!
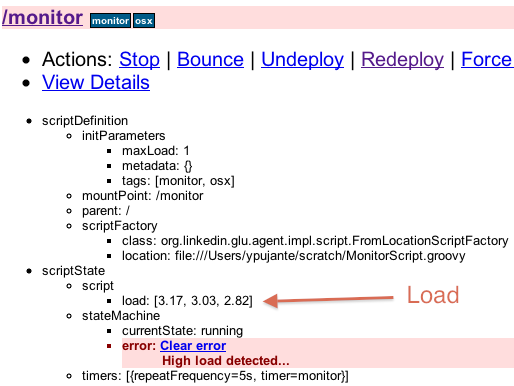
We can verify that it makes it in the console:

In this screenshot, everything below ‘View Details’ is coming directly from ZooKeeper. We can see the error message set by the script because it detected a high load, as well as the load itself. Note how the load is actually an array (under the cover the representation is json). This entry will change every time the timer executes (unless the load does not change of course).
Collecting and processing the monitoring data
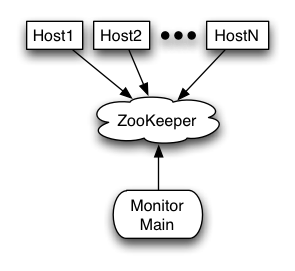
As we have seen the data makes it in ZooKeeper. The fact that you can view it in the console is nice, but if you want to process the data, you can write an external program that will connect directly to ZooKeeper. You can reuse the convenient class that the console uses: AgentsTracker and register a set of listeners to be notified when things change.
1
2
3
4
5
6
7
8
9
10
11
12
13
14
15
16
17
18
19
20
21
22
23
24
25
26
27
28
29
30
31
32
33
34
35
36
37
38
39
40
41
42
43
44
45
46
47
48
49
50
51
52
53
54
55
56
57
58
59
60
61
62
63
64
65
66
67
68
public class MonitorMain
{
  def zk = "localhost:2181"
  def fabric = "glu-dev-1"

  void run()
  {
    // establishes connection to ZooKeeper
    def zkClient = new ZKClient(zk, Timespan.parse("30s"), null)
    zkClient.start()
    zkClient.waitForStart(Timespan.parse("5s"))

    // creates a tracker to track events in ZooKeeper
    String zkAgentRoot = "/org/glu/agents/fabrics/${fabric}".toString()
    def tracker = new AgentsTrackerImpl(zkClient, zkAgentRoot)

    // registers the listeners
    tracker.registerAgentListener(agentEvents as TrackerEventsListener)
    tracker.registerMountPointListener(mountPointEvents as TrackerEventsListener)
    tracker.registerErrorListener(errorListener as ErrorListener)

    tracker.start()
    tracker.waitForStart()
    awaitTermination()
  }

  // track agent events (agent up or down)
  def agentEvents = { Collection<NodeEvent<AgentInfo>> events ->
    events.each { NodeEvent<AgentInfo> event ->
      switch(event.eventType)
      {
        case NodeEventType.ADDED:
        case NodeEventType.UPDATED:
          // ignoring add/update event
          break
        case NodeEventType.DELETED:
          log.warn "Detected agent down: ${event.nodeInfo.agentName}"
        break
      }
    }
  }

  // track mountPoint events
  def mountPointEvents = { Collection<NodeEvent<MountPointInfo>> events ->
    events.each { NodeEvent<MountPointInfo> event ->
      // only interested in the monitor events (/monitor was defined in
      // the console entry)
      if(event?.nodeInfo?.mountPoint == MountPoint.fromPath("/monitor"))
      {
        switch(event.eventType)
        {
          case NodeEventType.ADDED:
          case NodeEventType.UPDATED:
            log.info "${event.nodeInfo.agentName} |" +
               "${event.nodeInfo.data?.scriptState?.script?.load?.join(',')}"
            break
          case NodeEventType.DELETED:
            // ignoring delete event
          break
        }
      }
    }
  }

  // when an error happens
  def errorListener = { WatchedEvent event, Throwable throwable ->
    log.warn("Error detected in agent with ${event}", throwable)
  }
- 8-11: uses
ZKClientto establish a connection with ZooKeeper - 13-23: creates a tracker, registers the listeners and starts the tracker
- 28-41: this listener gets called back whenever an agent appears/disappears from ZooKeeper. Agents use the ephemeral node capability of ZooKeeper which means that if the agent fails for any reason (ex: machine reboots), the ephemeral node will go away and as a result this listener will be called.
 This is a very cheap and effective way to monitor the fact that a machine is still alive.
 - 44-63: this listener gets called back whenever there are changes in the mountPoints installed on any agents. For the sake of monitoring we do not care about any other but
/monitorwhich is why we filter it out. The expression:event.nodeInfo?.data?.scriptState?.scriptgives access to any of the fields of the glu script and in this case we are only interested in theloadfield. - 66-68: this listener gets called back whenever there are any errors (ex: loss of communication with ZooKeeper)
Here is the result of running this program:

Note that I intentionally killed the agent to demonstrate that I was receiving the event, which can be seen on line 5.
Conclusion
This post shows you how to:
- create a glu script which installs a timer on an agent/host
- run a monitoring command on the host and react based on the result (change the state)
- propagate monitoring information to ZooKeeper
- capture and handle this information in an external program
In a real monitoring solution, you probably will want to do a lot more than capturing the load and displaying it on the standard output. But the concepts will remain the same. I think the beauty of this solution lies in the fact that:
- if you use glu for deployment then the infrastructure is already in place! And if you don’t use glu (yet), then maybe you should consider using it as you can kill 2 birds with one stone!
- it is event based so you get notified only when things change or in other words you don’t need to ask every host what their status is: every host tell ZooKeeper what their status is and the external program is simply listening to ZooKeeper events.

- it is all open source and free.
References
- For more information about glu, check the documentation.
- You can download glu including the tutorial from the download page.
MonitorScriptsource code from github.
MonitorMainsource code from github.


